안녕하세요.
오늘은 huggingface 에 대해서 간단한 내용 하나 올립니다.
Huggingface는 누구나 손쉽게 생성형 AI (LLM) 모델을 가지고 테스트 해볼 수 있는 사이트 입니다.
이곳을 통해서 사용자들은 누구나 손쉽게 몇번의 클릭과 설정만으로 LLM 모델을 만들기도 하고 테스트해보기도 할수 있습니다.
Huggingface는 현재까지도 지속적으로 사용자들의 다양한 모델들이 등록되고 활용되고 있습니다.
당신이 LLM에 대해서 관심이 있다면 한번쯤 더욱 자세한 내용을 다루는 사이트 또는 직접 찾아가서 사용해 보길 바랍니다.
아래부터 본격적인 내용입니다.
Hello.
Today, I'm going to post a brief story about the Huggingface. Huggingface is a site that anyone can easily test with a generative AI (LLM) model. This allows users to easily create and test LLM models with a few clicks and settings.
Huggingface continues to register and utilize various models of its users. If you are interested in LLM, please visit a website that deals with more details or visit it yourself. This is the full-fledged content from below.
1. Huggingface intro
Hugging Face – The AI community building the future.
huggingface.co
위의 사이트는 누구나 쉽게 회원 가입을 해서 사용할 수 있습니다.
특히, 무료로 사용할수 있는 환경도 제공하기 때문에 간단한 테스트에도 활용 가능합니다.
오늘은 무료로 간단하게 기존 모델을 찾아서 space를 만드는것을 진행할 예정입니다.
Anyone can easily register and use the above site. In particular,
it provides a free environment, so it can be used for simple testing.
Today, we are going to simply find the existing model for free and make a space.
2. 회원가입 (sign up)
이 부분은 넘어가도록 하겠습니다.
skip this content
3. model Search
간단한 모델 테스트를 위해 대상이 되는 모델을 찾아야 합니다.
우선 사람들이 많이 테스트하는 Polyglot 모델을 사용해 보도록 하겠습니다.
이를 위해서 검색창에 Polyglot 을 넣고 검색합니다.
아래와 같이 화면이 나오면 아래쪽에 표시되는 See 468 Model results for "Polyglot" 를 선택합니다.
모델의 총 숫자는 이 글을 보는 시점에 따라 달라질수 있습니다.
그러면 현재 huggingface에 등록된 모델을 찾아서 목록을 보여줍니다.

For a simple model test, you need to find the target model.
First, let's try the Polyglot model, which people test a lot. To do this, put Polyglot in the search box and search for it.
When the screen appears as shown below, select See 468 Model results for "Polyglot" displayed at the bottom.
The total number of models may vary depending on when you view this article.
Find the model that is currently registered in Huggingface and display the list.
4. Model Select "polyglot-ko-1.3.b"
이곳에서 저는 "EleutherAI/polyglot-ko-1.3.b" 을 선택하겠습니다.
choose "EleutherAI/polyglot-ko-1.3.b".
그러면 아래 그림 처럼 모델에 대한 기본적인 내용이 표시됩니다.
This is detail info about choice model.
5. 모델 테스트를 위한 spaces 만들기 (Create Space)
우측 중간에 있는 Deploy 버튼을 선택하고 중간에 Spaces 메뉴를 선택합니다.
Select the Deploy button in the middle right and select the Spaces menu in the middle.

그러면 아래 그림과 같이 Gradio Space를 생성한다는 창이 표시됩니다.
여기서는 아무것도 할게 없습니다. 그저 하단의 "Create New Space"를 선택합니다.
This will display a window to create a Gradio Space as shown below.
There's nothing to do here. Just select "Create New Space" at the bottom.

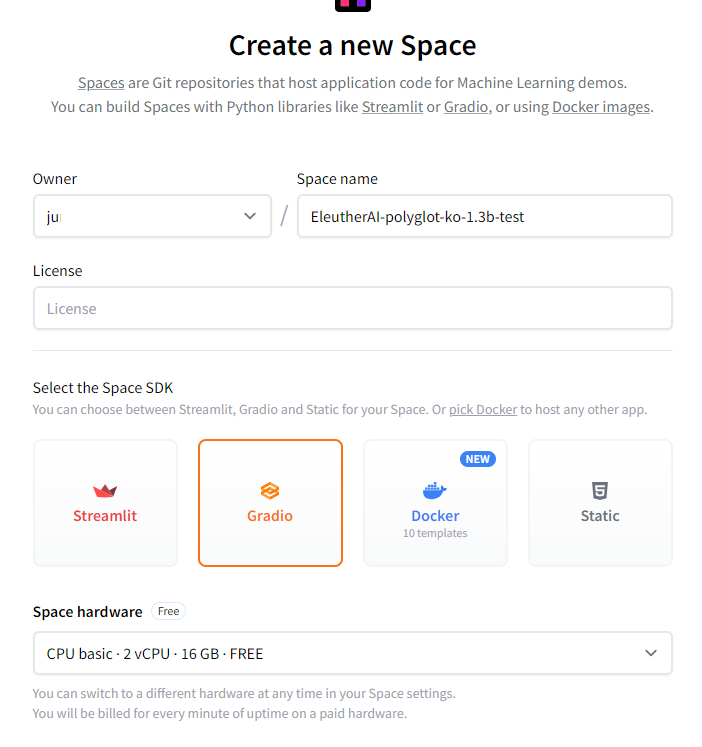
그러면 Owner와 Space name 그리고 License를 선택하도록 되어 있습니다.
이 부분에서 Space name은 적절히 만들면 되고 (그냥 놔둬도 됩니다.)
아래쪽 개발 방식도 그대로 둡니다.
여기를 선택하는 방식 중에 Gradio 방식을 사용함으로써 별도의 UI 개발 없이 간단히 모델에 대한 입/출력을 테스트 할수 있습니다.
Then you will choose Owner, Space name, and License.
In this part, you can make the Space name properly (you can just leave it alone)
Leave the development method at the bottom as well.
By using the Gradio method among the choices here, you can simply test the input/output to the model without developing a separate UI.
이제 하드웨어를 선택합니다.
제가 선택한 하드웨어는 무료 입니다.
물론, 모델의 사이즈에 따라서 유료 하드에어를 선택해야할 수 있습니다.
그래도 시간단위 비용 청구이므로 간단히 테스트 해보면 비용의 부담은 크지 않습니다.
Now select the hardware.
The hardware I chose is free.
Of course, depending on the size of the model, you may have to choose a paid hard air.
Still, it's a hourly charge, so if you test it simply, the cost isn't too much.

이제 모든 과정이 완료 됐습니다.
하단의 Create Space 버튼을 선택합니다. Space 만들기 완료 입니다.
The whole process is now complete.
Select the Create Space button at the bottom. Space creation is complete.

그러면 이제 아래와 같이 Space 생성에 대한 로그를 보여주는 화면으로 전환 됩니다.
이제 가만히~~~ 기다리면 됩니다.

모든 과정이 끝나면 아래 그림 처럼 화면에 로그가 나타 납니다.
그러면 이제 로그 창을 닫고 간단히 질문을 던져 봅니다.

6. 테스트
아래 그림 처럼 화면에 질문을 넣고 제출을 합니다. 그리고 기다립니다.
Put the question on the screen and submit it as shown in the picture below. And wait.

마우스 커서가 올려져 있는 상단의 버튼을 선택하면 언제든지 로그를 확인할 수 있습니다.
You can check the log at any time by selecting the button on the top of the mouse cursor.

전 아래와 같은 답변을 받았습니다.

여기까지가 Huggingface space 에 대한 가장 간단한 테스트 입니다.
여기서 조금 개발쪽으로 익히고 계시다면 python streamlit 을 이용한 웹 화면 구성이라든가 docker 기반의 컨테이너 구성이라든가를 해볼 수 있습니다.
이부분은 좀더 나중에 기회가 되면 다시 다루겠습니다.
현재 생성형 AI에 대한 내용이 많이 퍼지고 사람들이 관심이 늘어나면서 huggingface에 대한 관심역시 지속적으로 증가하는것 같습니다.
LLM 을 다루고자 한다면 한번쯤 활용해 보기시 바랍니다.
This is the simplest test for the Huggingface space.
If you're learning a little bit about development here, you can try to configure a web screen using Python streamlit or a docker-based container.
I will deal with this part again when I have a chance.
Currently, as the content of generative AI spreads a lot and people are interested in it, interest in Huggingface seems to be constantly increasing.
If you're interested in dealing with LLM, try using it.
'IT&컴퓨터 > IT 인터넷' 카테고리의 다른 글
| watsonx.ai python 이용해보기, watsonx.ai 를 이용한 ChatGPT (1) | 2023.10.27 |
|---|---|
| 프롬프트 작성 가이드, 프롬프트 엔지니어링 (2) | 2023.10.18 |
| IBM Watsonx Assistant 사용자 가이드 (0) | 2023.10.12 |
| 챗GPT 소설쓰기, chatgpt novel (Starcraft universe) (1) | 2023.10.06 |
| 무료 부트스트랩 - html5, admin&dashboard, bootstrap5 (1) | 2023.10.05 |